The necktie is a fashion staple among businessmen of all ages, giving a sense of sophistication to otherwise unexceptional outfits. They are the perfect finishing touch, making a man look distinguished and put together. Although the necktie elevates a suit, that doesn’t mean it has to be boring; through different knots, you can create a different look and feel that is as unique as the knot itself. Let’s take a deep dive into the different knots you can use for your necktie and how to tie them.
The History of the Neck Tie
The history of the necktie dates back to 1618 when the 30 Years’ War, when Croatian mercenaries would wear small neckerchiefs knotted around their necks, which quickly caught the eye of the French King Louis XIV. He took a liking to the look of the curious adornments and began wearing them himself at the tender age of seven years old. Named “La Cravate” by the boy king after their Croatian inventors, the name is used as the French word for the necktie to this day. The cravat continued to gain in popularity and evolve as styles changed. By 1818, a pamphlet called Neckclothitania, published a detailed article discussing the popular ways to tie the cravat and the appropriate circumstances for using each knot. This pamphlet is the first known printing of an educational necktie guide, but it would certainly not be the last!
Fast-forward to the 1920s, when Jesse Langford, a tie maker from New York, developed a patent for the modern necktie’s design. Appropriately named the “Langford Necktie,” chances are, you have one hanging in your closet! With the change in shape came new and improved tying methods, and the longer length enabled more creativity for how men could showcase their style. Soon, the type of knot used became a form of self-expression and a way to stand out from others wearing similar outfits. In this article, we will discuss eighteen different knot types, a brief history behind them, and a brief synopsis of how to create them.
The Full Windsor
The Full Windsor also called the Double Windsor knot, is believed to be named after the Duke of Windsor, also known as King Edward VIII, before he famously abdicated his thrown. However, many think it was actually his father, King George V, who invented the knot, but it’s impossible to know for sure. The Duke of Windsor had a particular pension for wide knots in his necktie and had custom versions made using thicker fabric to accomplish the look. With the invention of the Full Windsor knot, he could achieve a similar result without needing to use thicker material. The knot became popular among the UK armed forces until they deemed it inappropriate after the Duke’s abdication.

How to Tie a Full Windsor Knot
1. Make your neck loop
2. Pull the wide end up through your loop
3. Now take it down
4. Pass the wide end to the right behind the thin end
5. Pass it up through your neck loop
6. Take it out under the bottom of the neck loop
7. Bring it to the left of the thin end
8. Bring it up through the neck loop
9. Take it down through the central opening just created
10. Tighten, forming a center dimple
The Half Windsor
The Half Windsor is believed to be a simpler response to the Full Windsor Knot. It gained popularity in the 1950s thanks to its crisp look that gives a powerful air to any suit.

How to Tie a Half Windsor Knot
1. Lay the tie around the neck
2. Bring the wide end over the thinner end
3. Bring the wide end behind the right of the thin end
4. Pass up through the neck loop you created
5. Bring down through the neck loop and to the right of the thin end
6. Go up through the back of the newly created knot
7. Bring down through the central hole created in the knot
8. Tighten
The Four-In-Hand Knot
The Four-in-hand knot, also known as the schoolboy knot, is simplistic yet stylish. It is believed its origins date to the Four-in-Hand Club located in London, which wore the knot and brought it to fashion. Currently, it is one of only three approved knots for the United States Army and Navy uniforms.

How to Tie a Four-in-hand knot
1. Place the tie around the neck
2. Cross the wide end in front of the thin end
3. Fold behind and bring to the opposite side
4. Repeat crossing the wide end in front of the narrow end
5. Bring up through the neck hole
6. Pull down into the center hole created by the knot
7. Tighten
The Nicky Knot
The Nicky Knot was invented by a salesman named Ernesto Curami and is a popular knot in Italy. Its size is between a Four-in-hand and Half Windsor knot and is considered relatively large in size.

How to Tie The Nicky Knot
1. With the tie upside down, lay the thin end over the wide end
2. Bring the wide end over into the neck loop
3. Bring down and pass to the left
4. Take it up into the neck loop
5. Bring down through the center hole created
6. Tighten
The Bow Knot
The Bow knot, also known as the Bow tie, is believed to be the original knot used by the Croatians on the La Cravats. It is used today for formal occasions accompanied by a tuxedo.

How to Tie a Bow Knot
1. Start with one end longer than the other hanging around your neck
2. Cross the longer end over the shorter and up through the neck loop
3. Fold the shorter end horizontally
4. Pull the longer end over the center of the fold
5. Fold the longer end horizontally
6. Place the longer end fold through the loop behind the shorter end fold
7. Pull both ends gently to tighten
The Kelvin Knot
The Kelvin knot is named after the mathematician physicist Lord Kelvin (1824-1907) as a tribute to his significant advances in atomic structure knot theory.

How to Tie a Kelvin Knot
1. With the tie upside down, pass the wide end over to the right of the narrow end
2. Pass the wide end behind from the front to the back
3. Bring it to the right and up through the neck loop
4. Pass down through the center hole
5. Tighten
The Pratt Knot
The Pratt knot is named after its creator Jerry Pratt, a US Chamber of Commerce member in the 1950s. It works well with shorter ties or on taller men and has a medium thickness.
How to Tie The Pratt Knot
1. Cross the wide end behind the thin end to the left
2. Bring up, then down into the neck loop to the left again
3. Go over the thin end to the right, then up into the neck loop
4. Bring down into the center hole
5. Tighten
The Oriental Knot
The Oriental knot received its name from its popularity in Asia. It’s considered the easiest knot to tie and also the smallest.

How to Tie The Oriental Knot
1. With the backside facing forward, drape over the neck with the wide end on the right
2. Bring the wide end to the left behind the thin end, then over the top it to the right
3. Bring into the neck loop
4. Pull down through the center hole
5. Tighten
The Balthus Knot
The Balthus knot is believed to be invented by Balthasar Klossowski in the 1930s. It’s said he created it due to boredom but never wore it regularly.

How to tie The Balthus Knot
1. With the backside of the tie upwards, drape around the neck with the wide end on the right
2. Place the wide end under the thin end to the right
3. Pull up toward the neck loop, then down to the right
4. Bring back up to the center of the neck loop and back down to the left
5. Bring up to the center of the neck loop again and down to the right
6. Pull across the thin end to the left and up through the neck loop
7. Bring down through the center knot
8. Tighten
The Hanover Knot
The Hanover knot is rumored to come from the House of Hanover, a royal dynasty in the Uk ruling from 1714 to 1901; however, there is no definite proof of this origin.

How to Tie The Hanover Knot
1. With the backside up, place the wide end on the right
2. Cross the thin end over the wide end to the right
3. Bring the wide end over the thin end to the right
4. Bring the wide end up underneath through the neck loop
5. Pull the wide end down to the left
6. Bring the wide end under the thin end to the right
7. Bring it up to the center and down the neck loop to the left
8. Pull the wide end to the right of the thin end
9. Bring up the center to the neck loop
10. Pull down through the center hole
11. Tighten
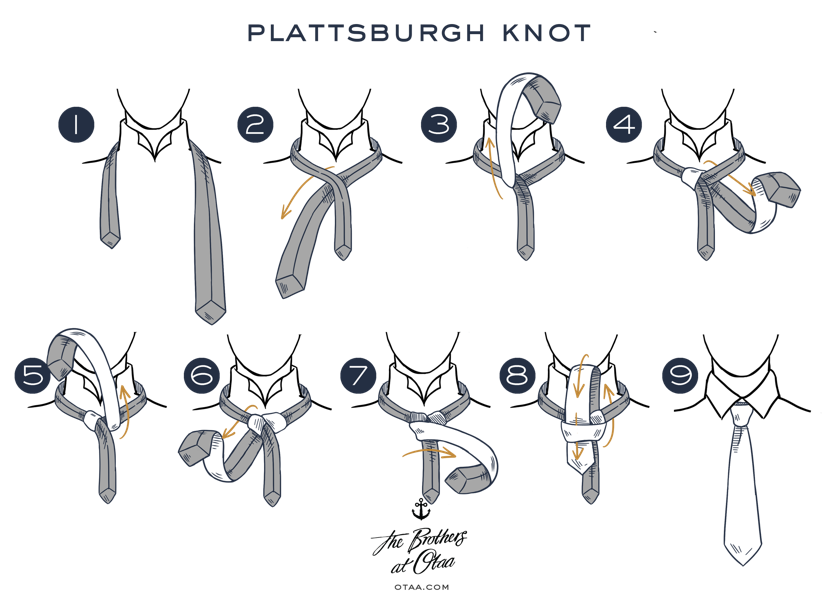
The Plattsburgh Knot
The Plattsburgh knot was invented by Thomas Fink and named after his hometown in New York. It’s a larger knot and great for tall, broad-shouldered men since it helps balance their proportions.

How to Tie The Plattsburgh Knot
1. Place the tie around the neck, backside up, wide end on the left, and 4-5 inches lower than the thin end
2. Cross the wide end under the thin end to the right and up through the neck loop
3. Bring down to the left and back up through the neck loop
4. Bring down to the right and cross over the thin end to the left
5. Bring behind and up through the back of the neck loop
6. Bring down through the center hole
7. Tighten
The Grantchester Knot
Although its origins are unclear, it’s believed Yong Mao and Thomas Fink may have invented the Grantchester knot during their mathematical study on neckties.

How to Tie The Grantchester Knot
1. Place the tie around the neck, backside up, wide end on the left, and 4-5 inches lower than the thin end
2. Cross the wide end behind the thin end to the right
3. Bring across the front to the left
4. Wrap around behind the thin end to the right
5. Repeat step two and three
6. Bring behind the thin end up the back of the neck loop
7. Pull down left and bring behind the thin end
8. Bring to the front and to the right, crossing to the back
9. Pull up through the back of the neck loop and down the center hole
10. Tighten
The Victoria Knot
The Victoria knot is named for Queen Victoria and is a well-balanced knot, perfect for large and small men.

How to Tie The Victoria Knot
1. Drape the tie over the neck with the wide end on the right
2. Cross the wide end over the thin end to the left
3. Take the thin end to the right
4. Wrap the wide end over the thin end on the left
5. Bring around the thin end to the right
6. Wrap again to the left
7. Bring the wide end up through the neck loop
8. Pull down through the center hole
9. Tighten
The Café Knot
The Café Knot was a favorite of café goers in the early 20th century. It is fairly complicated but unique.

How to Tie a Café Knot
1. Drape around the neck with the wide end on the right and lower than the thin end
2. Cross the thin end over the wide end, bringing the thin end up through the newly formed loop
3. Bring the thin end over the top of the knot and down to the right
4. Bring the thin end across the knot to the right
5. Bring the thin end behind the neck loop and down to the left over the knot
6. Fold behind the knot to the right
7. Bring through the neck loop and down to the left
8. Flip the wide end up and over your shoulder
9. Pull the thin end through the loop
10. Flip both ends down
11. Tighten
The Eldredge Knot
The Eldredge knot was invented in 2007 by Jeffrey Eldredge and works with any size tie.

How to Tie The Eldridge Knot
1. Drap tie around neck with the wide end on the left
2. Bring the thin end over the wide end to the left and under to the right
3. Bring up under the neck loop and down to the left
4. Bring across the front to the right, then under the neck loop
5. Bring down to the left and around the back to the right
6. Bring across the front to the left and repeat the previous step
7. Pull thin end to the left and tighten
8. Bring up the center of the neck loop and down to the left
9. Bring up the center of the neck loop and down to the right
10. Go across the front to the left and repeat the previous step
11. Bring the thin end to the left and tighten
12. Tuck the thin end behind the neck loop to the left
The Trinity Knot
The Trinity knot is believed to be a pagan Celtic symbol, but its exact origins are unknown.

How to Tie The Trinity Knot
1. Place over the neck with the wide end to the right
2. Cross the thin end in front to the right and under the neck loop
3. Bring down to the right and behind the wide end to the left
4. Bring up ver the neck loop and down to the right
5. Bring around to the left and under the neck loop
6. Bring down to the right and through the loop
7. Bring behind the wide end to the left and round to the right
8. Bring through the loop and over the neck loop to the right
9. Tighten
The Christensen Knot
The Christensen knot was created for a Swedish mail-order magazine for clip-on ties.

How to Tie The Christensen Knot
1. Drape the tie around the neck with the wide end on the left hanging six inches lower than the thin end
2. Cross the wide end over the thin to the right
3. Bring behind and to the left
4. Bring up into the neck loop and down to the right
5. Cross in front of the thin end and bring behind to the right
6. Repeat bringing up through the backside of the neck loop
7. Pull down through the center hole
8. Tighten
The St. Andrew Knot
The St. Andrew knot is named for the patron saint, who wards against sore throats. It’s considered a robust knot a relatively easy to make.

How to Tie The St. Andrew Knot
1. Begin with the seam facing out and the wide end on the right
2. Bring the wide end under the thin end to the left
3. Wrap around the front to the right
4. Repeat
5. Bring the wide end up through the neck loop and down to the right
6. Wrap around the front of the knot and up through the back of the neck loop
7. Bring down through the center hole
8. Tighten